更多>>关于我们
 西安鲲之鹏网络信息技术有限公司从2010年开始专注于Web(网站)数据抓取领域。致力于为广大中国客户提供准确、快捷的数据采集相关服务。我们采用分布式系统架构,日采集网页数千万。我们拥有海量稳定高匿HTTP代理IP地址池,可以有效获取互联网任何公开可见信息。
 您只需告诉我们您想抓取的网站是什么,您感兴趣的字段有哪些,你需要的数据是哪种格式,我们将为您做所有的工作,最后把数据(或程序)交付给你。
 数据的格式可以是CSV、JSON、XML、ACCESS、SQLITE、MSSQL、MYSQL等等。
更多>>技术文章
更多>>官方微博
-
【经验分享】未解锁BL的手机进9008模式(Mi6X为例)
对于未解锁BL的手机,需要拆机,通过短接特定触点的方式进入9008模式。
以小米Mi6X为例:
第一步,拧掉充电口旁边的两颗螺丝。
第二步,扣开后盖,可能不太好扣,可以借助美工刀在边缘撬一下。拧掉保护条上的3个螺丝。
第三步,拔掉电池排线。看图,记着两个短接触点的位置。
第四步,用镊子短接两个触点,同时插入TypeC线,2秒左右设备管理器"端口COM"里会出现9008接口,此时松开镊子。发布时间:2024-11-27 10:13:20
-
【经验分享】已解锁BL的手机进9008模式
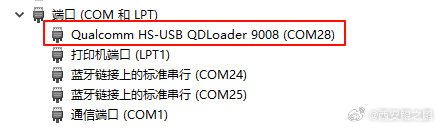
高通9008模式全称"Qualcomm HS-USB QDLoader 9008",它相对于recovery、fastboot和Android系统是独立的。即深刷模式,也叫EDL,号称"救砖神奇"。
对于已解锁BL的手机,进入9008相对比较简单,以小米Mi6X为例:
1. 先确定手机是否解锁BL了。已解锁BL的手机,刚开机的时候会有"Unlocked"字样,如附图1所示。
2. 长按“音量减键 + 开机键”进入fastboot。
3. 执行fastboot oem edl,即可进入9008模式,进入成功后设备管理器COM端口里可以看到"Qualcomm HS-USB QDLoader 9008"。如附图2、3所示。发布时间:2024-11-26 12:53:03
-
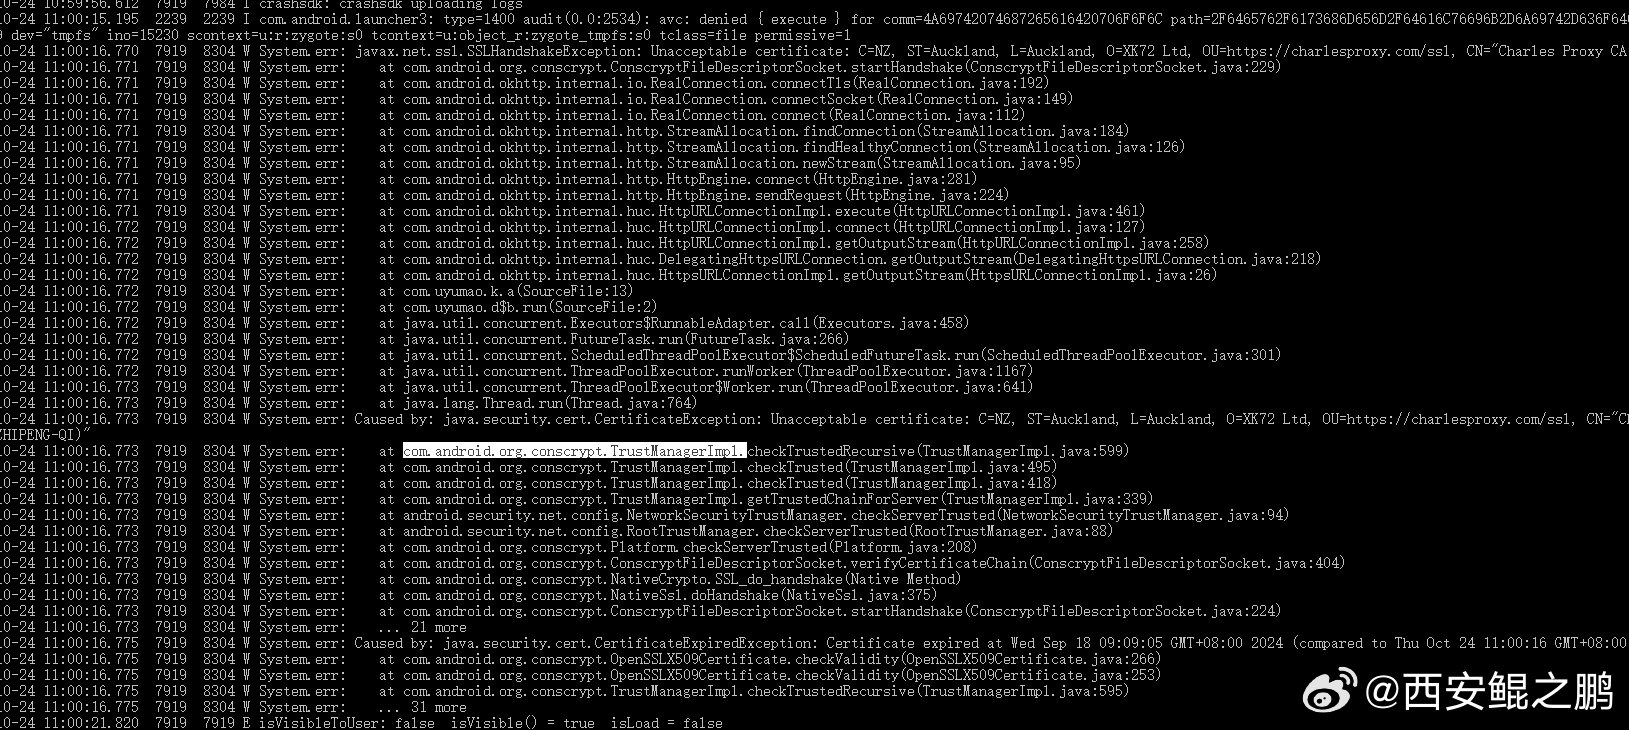
【经验分享】com.android.org.conscrypt.TrustManagerImpl证书固定检测绕过示例
某APP使用通用的sslunpinning脚本后仍然抓不到包:
(1)分析logcat日志,发现com.android.org.conscrypt.TrustManagerImpl类相关代码抛出java.security.cert.CertificateException异常,如图1所示。
(2)hook 类com.android.org.conscrypt.TrustManagerImpl的checkTrusted和checkServerTrusted方法,返回空列表,成功抓到包。
日志线索寻找关键词:CertificateException、CertificateExpiredExceptio、SSLHandshakeException发布时间:2024-10-24 15:36:45
-
【经验分享】如何获取安卓手机上已安装APP的安装包(.apk)文件?
1. 先查看已安装APP列表,确定对应APP的包名。
adb shell pm list packages
2. 假设包名为org.gushiwen.gushiwen。再根据包名查看APP的详细信息:
adb shell dumpsys package org.gushiwen.gushiwen
返回信息中的path属性,以base.apk结尾的,即就是这个APP的安装文件,如附图1所示。另外返回的信息中还有当前APP的版本(versionName属性),如附图2所示。
3. pull下来这个文件,就可以在其它设备上安装了。发布时间:2024-10-22 11:27:51
-
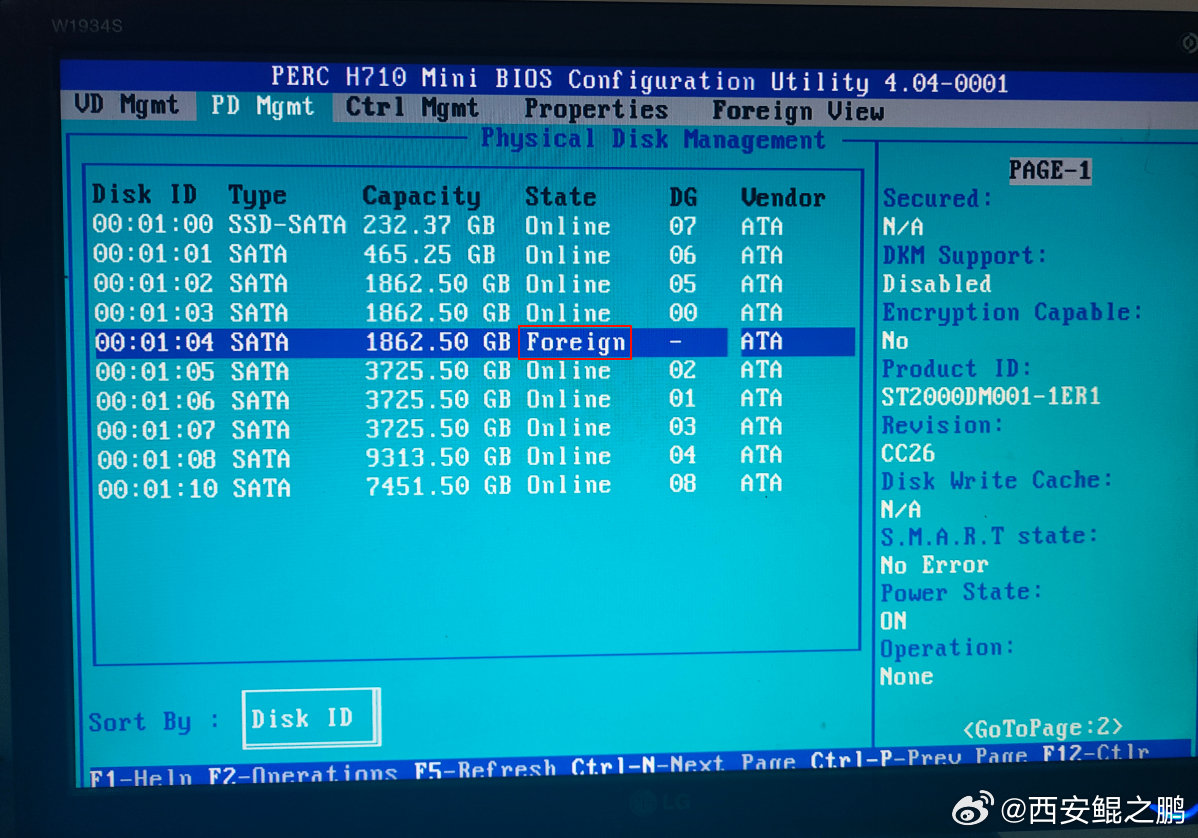
【经验分享】Dell R720意外断电重启之后丢失硬盘(硬盘状态变为Foreign)问题解决?
本来有10块盘,启动的时候显示只有9块Virtual Disk。“Ctrl + R”进入RAID设置,在“VD Mgmt”标签页下也只看到了9块Virtual Disk。在“PD Mgmt”标签页下看到是有10块物理盘,不过第5块状态变成“Foreign”了(如附图1所示)。
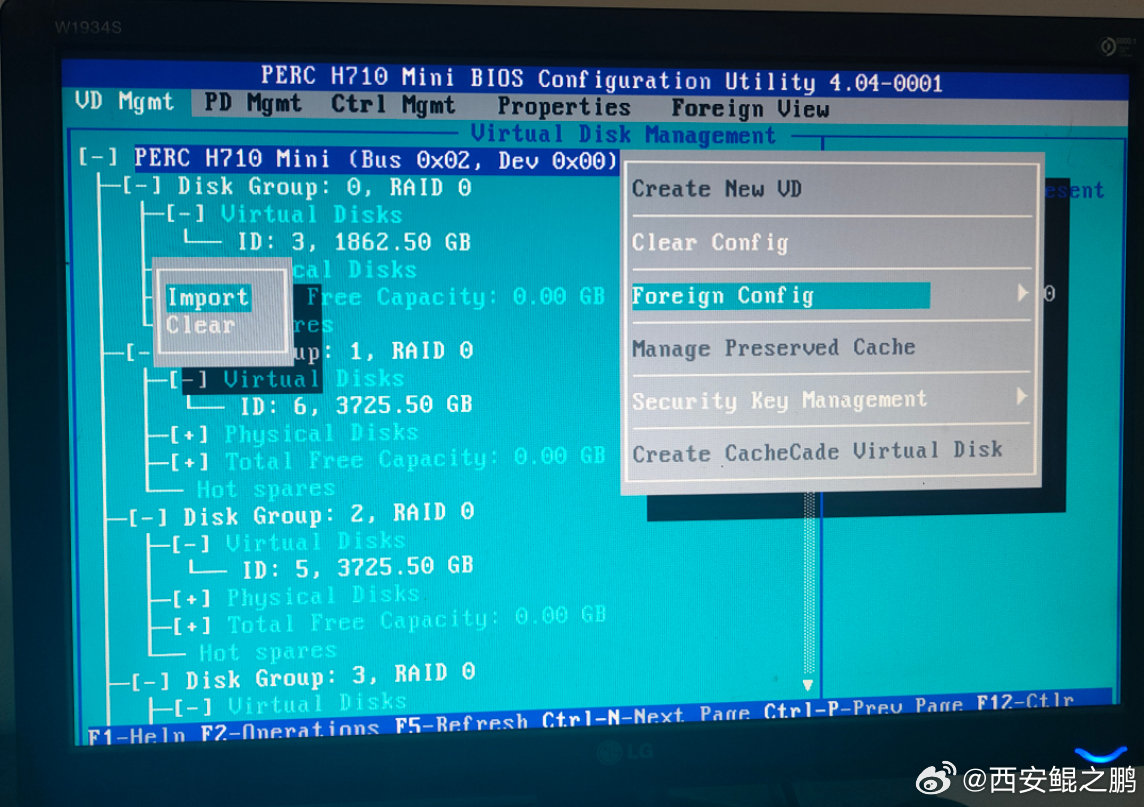
解决方法:在“VD Mgmt”标签页下,焦点切换到"PERC H710 Mini"上按F2,然后"Foreign Config",再然后"Import",操作完成(要等待几秒)之后就能看到全部盘了,如图2所示。
PS:用Ctrl + N快捷键切换菜单标签。发布时间:2024-10-18 16:35:44
-
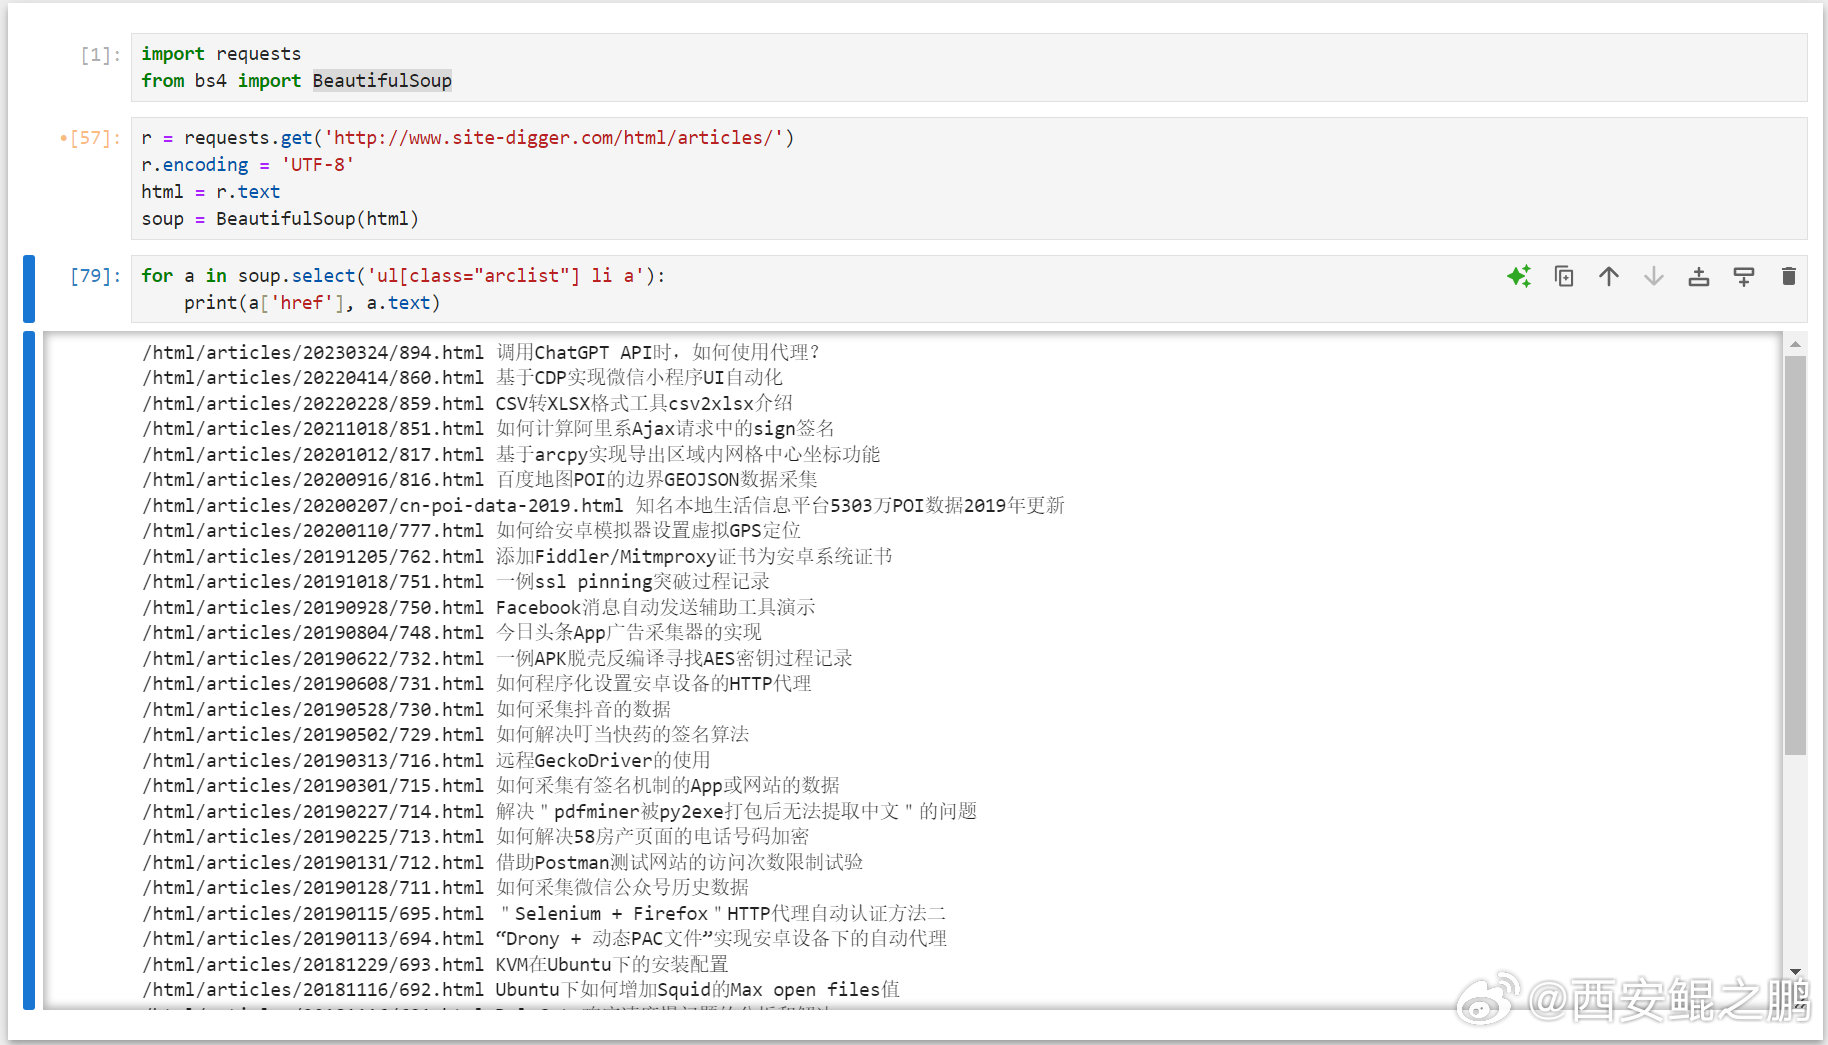
【经验分享】一个游戏闯关模式学习CSS Selector的网站"CSS Diner":https://flukeout.github.io/。
Python使用BeautifulSoup实现CSS Selector解析HTML文档的示例:
import requests
from bs4 import BeautifulSoup
r = requests.get('http://www.site-digger.com/html/articles/')
r.encoding = 'UTF-8'
html = r.text
soup = BeautifulSoup(html)
for a in soup.select('ul[class="arclist"] li a'):
print(a['href'], a.text)发布时间:2024-09-02 19:43:03
-
【经验分享】qemu-system-x86运行tiny11
(1) 安装qemu-system-x86,安装完成后无需重启。
sudo apt-get update
sudo apt-get install qemu qemu-utils qemu-system-x86
(2) 创建硬盘。
qemu-img create -f qcow2 tiny11.img 50G
(3) 创建虚拟机。
sudo qemu-system-x86_64 --enable-kvm -m 2G -smp 4 -boot order=dc -hda /home/qi/kvm/tiny11-1/tiny11.img -cdrom /home/qi/kvm/tiny11_23H2_x64.iso -vnc :1
(4) vnc连接 "服务器ip:5901",完成系统安装过程。设置vnc密码的方法:https://qemu-project.gitlab.io/qemu/system/vnc-security.html#with-passwords。
(5) 映射主机端口给虚拟机,使用-redir参数。如下示例,将主机的TCP/UDP4001端口映射到虚拟机的4000端口。
-redir tcp:4001::4000 -redir udp:4001::4000发布时间:2024-08-10 12:13:46
-
【经验分享】Playwright过geo.captcha-delivery.com检测
page.add_init_script('''Object.defineProperties(navigator, {webdriver:{get:()=>undefined}}); delete navigator.__proto__.webdriver;''') 发布时间:2024-07-31 10:41:18
-
【经验分享】scrcpy在网络质量欠佳环境下可以通过降低码率来提高流畅度
e.g.
scrcpy --bit-rate 1M --max-fps 5
注意:在新版本中--bit-rate参数更名为--video-bit-rate 发布时间:2024-07-03 10:11:54
-
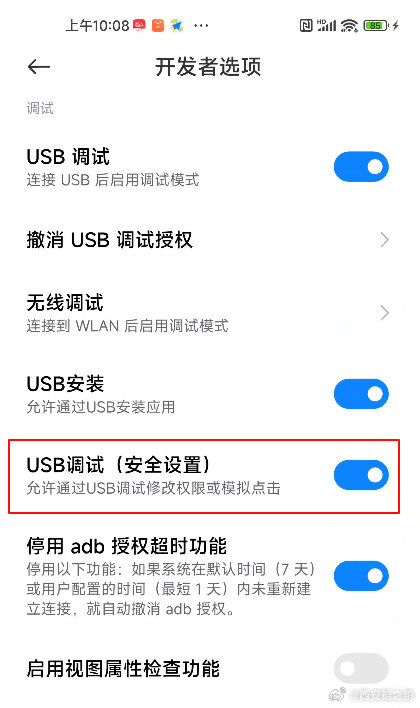
【经验分享】scrcpy在小米手机上鼠标不起作用问题的解决
在“开发者选项”中需要打开"USB调试(安全设置) - 允许通过USB调试修改权限或模拟点击"。要打开这个选项,手机需要先登录小米账号,另外手机必须要插有SIM卡。 发布时间:2024-07-03 10:09:29


先说一下为什么选择KVM。笔者曾使用VMware虚拟机多年,它的GUI管理工具做的很出色,容易维护,但是期间遇到了一些问题,始终无法得到根治,后来换用KVM问题得到了解决。结合我的实际体验说一下KVM的优势:
- KVM不需要桌面图形环境支持,能够在Linux Server版本下运行。
- KVM的各种操作(创建、修改、起停、状态查看、删除、克隆等等)都在命令行下进行,不需要依赖GUI,因此很方便集成到自己的应用中去(比如,你可以实现一个自动化的VPS售卖平台)。
- 网络更稳定。笔者使用VMware遇到最令人头疼的问题就是:经常遇到虚拟机重启后会莫名奇妙丢失网络(NAT模式),往往需要多次重启(或者关机操作)后才能恢复正常。在多种平台(Win7、Windows server 2012、Win10)、不同VMware版本下都遇到过这个问题。KVM是基于Linux内核的虚拟机(Kernel-based Virtual Machine,因此简称KVM),网络稳定性应该更好(目前使用过程还没有遇到类似的网络不稳定的问题)。
KVM在Ubuntu下的安装:
# 安装kvm相关软件包
sudo apt-get install qemu qemu-kvm libvirt-bin virtinst bridge-utils cpu-checker
# 验证安装是否成功
kvm-ok
创建桥接网卡:
注意:默认kvm虚拟机是NAT模式上网。如果想要使用桥接模式,需要我们先配置好桥接网口(先确保已安装好了bridge-utils)。配置示例如下:
sudo vi /etc/network/interfaces
# 编辑内容如下
# 这里我们创建了两个网桥,br0桥接eth0,br1桥接eth1。br0配置了网关,主机通过该口访问外网。

auto eth0
iface eth0 inet manual

auto eth1
iface eth1 inet manual

auto br0
iface br0 inet static
        address 192.168.1.88
        netmask 255.255.255.0
        gateway 192.168.1.1
        network 192.168.1.0
        dns-nameservers 114.114.114.114
        bridge_ports eth0
        bridge_stp off
        bridge_fd 0
        bridge_maxwait 0

auto br1
iface br1 inet static
        address 10.10.1.1
        bridge_ports eth1
        bridge_stp off
        bridge_fd 0
        bridge_maxwait 0
创建虚拟机:
# 创建虚拟机,安装ubuntu18.04 server版。
# 先下载好系统安装iso文件(e.g. 本例用的ubuntu-18.04.1.0-live-server-amd64.iso)
sudo virt-install \
--virt-type=kvm \
--name ubuntu1804server \
--ram 4096 \
--vcpus=4 \
--os-type=linux \
--os-variant=generic \
--hvm \
--cdrom=/home/qi/kvm/ubuntu-18.04.1.0-live-server-amd64.iso \
--network=bridge=br0,model=virtio \
--graphics vnc,listen=127.0.0.1,port=5900\
--disk path=/home/qi/kvm/ubuntu1804server.qcow2,size=20,bus=virtio,format=qcow2
--name参数用来指定要创建的虚拟机的名称(本例为ubuntu1804server),后面我们要操作该虚拟机的时候都需要提供该信息。如果想采用NAT模式上网,修改为--network network=default 即可。
执行上述创建虚拟机命令之后会提示让安装系统。用VNC客户端连上去,然后像给物理机安装系统一样正常安装即可,如下图所示。

虚拟机的常用操作:
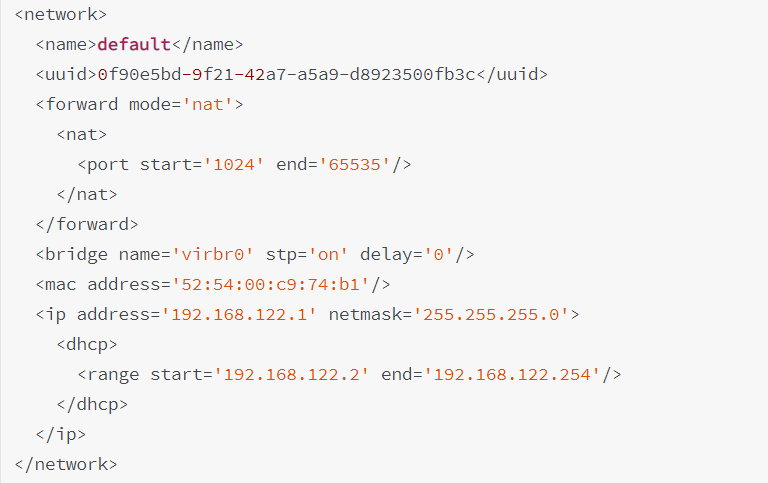
# 列出当前主机上所有KVM虚拟机
sudo virsh list --all
# 查看虚拟机的信息
sudo virsh dominfo ubuntu1804server
PS: 这里只能列出部分信息,虚拟机的详细配置参数可见于该虚拟机的XML配置文件
# 关闭虚拟机
sudo virsh shutdown ubuntu1804server
# 强制关闭虚拟机
sudo virsh destroy ubuntu1804server
# 启动虚拟机
sudo virsh start ubuntu1804server
# 设置虚拟机开机自启动
sudo virsh autostart ubuntu1804server
# 取消开机自启动
sudo virsh autostart --disable ubuntu1804server
# 编辑虚拟机配置(修改内存大小、CPU核心数、光驱ISO文件、虚拟网卡配置、VNC配置、虚拟硬盘文件路径等等)
sudo virsh edit ubuntu1804server
PS:本质是调用vi修改虚拟机XML配置文件,修改后重启虚拟机才能生效。
例如,修改光驱ISO文件:
<disk type="file" device="cdrom">
...
<source file="/home/qi/kvm/virtio-win-0.1.141.iso"></source>
...
</disk>
# 查看虚拟机的VNC端口
sudo virsh vncdisplay ubuntu1804server
返回信息说明: 0 表示VNC为 5900 端口,:1为5901,以此类推 。
# 克隆虚拟机(将ubuntu1804server克隆为ubuntu1804server-new)
sudo virt-clone -o  ubuntu1804server -n   ubuntu1804server-new  -f /var/lib/libvirt/images/ubuntu1804server-new.img
# 如何迁移虚拟机?
将虚拟机XML配置文件和虚拟硬盘文件传至新服务器上,并修正XML文件中虚拟硬盘文件的路径,然后执行下面命令导入该虚拟机:
sudo virsh define XML文件名
# 删除虚拟机
sudo virsh undefine ubuntu1804server
# 查看当前网络配置
sudo virsh net-list --all
# 查看default网络配置详情
virsh net-dumpxml default
# 输出示例如下
NAT端口映射:
如果虚拟机采用default网络模式(即NAT)上网,想要从外网直接访问虚拟机上的服务,需要在主机(母机)上使用iptables做NAT端口映射,如下示例为将母机的2208端口映射到虚拟机192.168.122.101的SSH端口(22):
# 可以将这些规则加到/etc/rc.local中,每次开机就能自动载入,为了能够在KVM启动之后才载入这些规则,需要第一条之前加上 sleep 30,以等待足够长的时间,确保KVM默认的防火墙规则已加载完毕(否则KVM默认的REJECT规则优先级会更高)
# sleep 30
sudo /sbin/iptables -t nat -A PREROUTING -p tcp --dport 2208 -j DNAT --to 192.168.122.101:22
#下面这条很重要,缺少了无法联通,因为KVM默认添加的规则没有允许NEW状态的转发。
sudo /sbin/iptables -I FORWARD -m state -d 192.168.122.0/24 --state NEW,RELATED,ESTABLISHED -j ACCEPT
备忘:
qemu-kvm虚拟机配置文件(XML)存储路径:/etc/libvirt/qemu
参考资料:
KVM 虚拟化技术
https://www.cnblogs.com/clsn/p/8366251.html
KVM系列教程:
https://www.cnblogs.com/chenjiahe/p/5909584.html
https://www.cnblogs.com/polly-ling/articles/7154334.html
How to install KVM on Ubuntu 16.04 LTS Headless Server
https://www.cyberciti.biz/faq/installing-kvm-on-ubuntu-16-04-lts-server/
Ubuntu14.04+KVM配置虚拟机桥接(bridge)
https://blog.csdn.net/FIELDOFFIER/article/details/48497833
https://www.jianshu.com/p/199b1d39590b
Ubuntu server 16.04 as a Hypervisor using KVM and Kimchi for VM Management
KVM/libvirt: Forward Ports to guests with Iptables
https://aboullaite.me/kvm-qemo-forward-ports-with-iptables/
KVM使用NAT联网并为VM配置iptables端口转发,kvmiptables
https://www.cnblogs.com/dwj192/p/8862199.html
KVM虚拟机的克隆
https://www.cnblogs.com/5201351/p/4461000.html
Creating Windows virtual machines using virtIO drivers
Centos 6.7 KVM下安装windows 7系统
https://www.cnblogs.com/weifeng1463/p/6807997.html
Guest Support Status
https://www.linux-kvm.org/page/Guest_Support_Status
KVM设置启动顺序
https://stackoverflow.com/questions/19011159/how-to-set-boot-order-on-kvm-libvirt-virsh
动态挂载光驱
Forwarding ports to guests in libvirt / KVM
https://serverfault.com/questions/170079/forwarding-ports-to-guests-in-libvirt-kvm
Setting Remote Desktop access password in KVM
https://stackoverflow.com/questions/4785494/setting-remote-desktop-access-password-in-kvm
https://www.cyberciti.biz/faq/linux-kvm-vnc-for-guest-machine/
libvirt Networking Handbook
https://jamielinux.com/docs/libvirt-networking-handbook/index.html
DISPLAYING THE IP ADDRESS AND PORT NUMBER FOR THE VNC DISPLAY